Overlay Editor User Interface

Menu overlay is a layer that shows on your regular virtual tour giving the user a navigational guide around large spaces such as hotels, shopping centers, schools, or any other business types. A Virtual Tour with overlay provides the users with easier navigation and information about specific areas in the Virtual Tour.
With Gothru Overlay Editor, you can add highly customizable information hot spots, popup boxes, navigational menus, maps, and many more extras. The overlay is then published directly on Google Maps or the Street View Application and embedded on a website where you can share with the visitors.
The GoThru Overlay Editor consists of 4 areas:
LEFT SIDE AREA
Along the left side of Overlay's interface is the overlay toolbar. The Bar is where you can find various options and commands such as Menu shortcut, Plugin manager, Menu manager, and Asset manager.
Menu Shortcut
The Menu shortcut on the left corner offers a range of shortcuts such as Back to Dashboard, Back to Tour page, Overlay manager, Save, and Clear all.
Plugin Manager
Plugin Manager is where Overlay holds all of its plugins. You'll find it along the left of Overlay's interface. There are plugins for Menus, Hotspots, Maps, Control center, and other useful plugins. Click on the “+” (A key) icon to open the Plugin Manager for Hotspots, Menus, Maps, Control Center, and Other.
- Menu allows you to create a clickable menu to showcase different areas of your virtual tour, so the visitors can click and go straight through to the part of the building that they are most interested in.
- Hotspots allow you to set up pop-up windows that present extra information to viewers about what they’re seeing on your tour.
- Maps can be used to improve navigability and make the environments within a virtual tour more accessible.
- Control center is a control element on Gothru Overlay that sets up on-screen buttons intended to aid visitors in accessing information and navigating the entire virtual tour.
- In Other, you can set a couple of optional plugins to further enhance your Overlay's features such as carousel, language, logo, code, password, pano label, and splash Screen.
Theme Manager
The second icon (T key) is to choose the overlay Theme. There are theme options, Side Menu, Top Menu, and Real Estate.
Asset Manager
The File icon (F key) opens the Asset Manager. GoThru accepts the following types of files: jpg, png, gif, SVG, mp3, mp4.
Help Button
Click on the “?” (Help) sign, located on the lower left side, to open the key shortcuts list.
RIGHT SIDE AREA
Along the right of Overlay's interface is where you find the setting panel. This panel also gives you access to all sorts of commands and options, and there are different panels for different plugins.
General Settings
The overlay general setting is used to set the basic configuration settings for your overlay. By default, the general setting will be displayed on the right side of your overlay screen. Under General Settings you could customize the Open graph, common colors, first panorama, and more; for the example below the menu has been customized:
- Add a title to the Menu
- Description
- Tags
- Logo image and Favicon, that you can select from under your uploaded Files
- Select the first panorama of the overlay
- Field of view of the first panorama
Active Plugin
You can also access general settings and other active plugins from the Active Plugin. Clicking the up arrow will expand the active plugin to show all the active plugins and the down arrow to return it to the default layout.
Detaching Active Plugins
You can detach all active plugins from the overlay desktop so they can be moved anywhere over it or seen by Windows and Overlay as separate applications.
Hotspot Groups
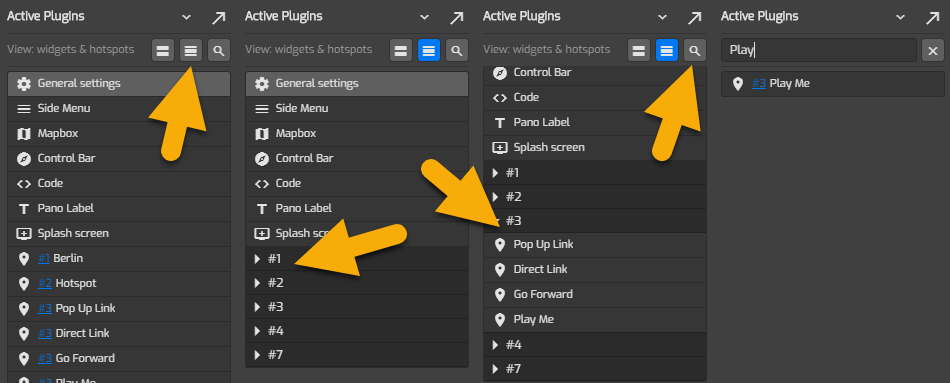
Under the Active Plugin section, you can group the hotspots per pano, search for an active plugin, and filter between seeing widgets, hotspots or both.

Google Street View
Google Street View is where Overlay holds a couple of Google functionalities Google logo, Google copyright, Google levels, Google address, Google fullscreen, Google motion, Google arrow, and Google pancake.
TOP AREA
Along the very top of Overlay's interface is a menu bar for the Overlay. The menu bar is where you can find various functional buttons, such as save button, publish button, share button, language, the general setting and pano list.
Save, Publish and Share
To save any changes or setups you make, you can click the “save” and “publish” buttons on the top bar. You can also share your overlay with the business owners or friends using the “share” button next to the publish button.
Language
The overlay also allows you to change the language, just click the language button and select the desired language.
Pano List
Pano List shows the Mapbox and all the panoramas you have in the constellation. You can select a panorama from the pano list and incorporate it into the Overlay plugins.
Adding Extra Tour
Under the Pano List, there are “-” and “+” buttons that allow you to add extra tours to the Overlay. Let's say you have 5 different virtual tours and you want to incorporate them into one Overlay, just click the “+” button. The Overlay editor will combine all the panoramas and incorporate the menus as well.
General Setting Shortcut
You can also click on the gear-shaped "Settings" icon to open the general setting menu.
BOTTOM AREA
Overlay Responsive
It shows the responsiveness of the overlay on desktop, tablet, or mobile devices. The overlay can also adjust the screen size (width or height) for different devices.
And there you have it! That's a quick overview of the interface and its features of GoThru Overlay editor. Please visit https://gothru.co to start your overlay.
