How to Apply Nadir Blur Patching in GoThru
In this tutorial, you'll learn how to apply a nadir blur patch to your panoramas using GoThru. This is a quick way to hide your tripod or other objects at the bottom of the 360 image without using a custom nadir logo.
Step-by-Step Guide
① Open the Nadir Manager
From your Tour Dashboard, go to the left-side menu and click on Nadir Manager under the Tour Tools section.
② Select a Panorama
Choose the panorama you want to patch by clicking on the "Nadir Patching" button shown on its thumbnail.
③ Adjust the Blur Patch
Once in the Nadir Patching window:
- Disable "Use Mirror Ball" (make sure it's toggled OFF).
- You will see a circular blur patch over the nadir area (as shown in the preview).
- Use the “Scale Nadir” slider to adjust the size of the blur.
- No need to upload any image — the blur is generated automatically.
④ Apply the Blur
When satisfied with the blur position and size:
- Click the "Apply" button in the bottom right corner.
- If you want to apply the same blur patch to every panorama in the tour: Toggle “Apply All” to ON before clicking Apply.
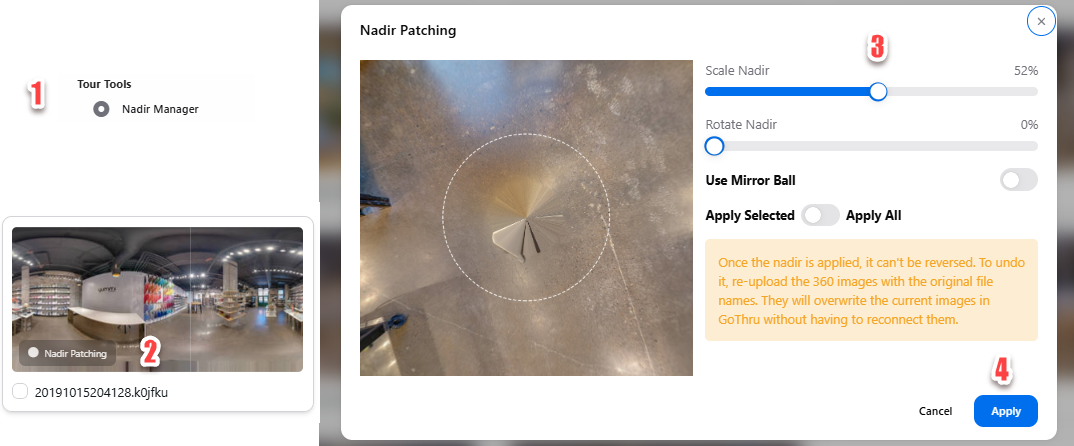
Important Note: Once applied, this blur patch cannot be undone. To revert it, you’ll need to re-upload the original 360 image using the exact same file name. This will overwrite the edited version.